January 22, 2013

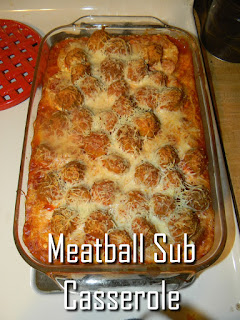
Meatball Sub Casserole

The pictures for this casserole make it look delicious. But, we did not like it at all. Okay, I'll give it some credit, everything was good except for the ridiculously soggy bread on the bottom. Now, if you like really soggy bread, then this is the recipe for you.


1 loaf Italian bread, cut into 1-inch thick slices
1 (8 oz.) package cream cheese, softened
1/2 cup mayonnaise
1 tsp. Italian Seasoning
1/4 tsp. pepper
2 cups shredded mozzarella cheese, divided
1-lb. pkg. fully cooked frozen meatballs, thawed
1 (28 oz.) jar pasta sauce
1 cup water


Preheat oven to 350 degrees. Mix cream cheese, mayonnaise, and italian seasoning. 


Place bread slices on bottom of baking dish. (Toast bread if you don't want it so soggy)


Cover with the cream cheese mixture and mozzarella cheese


Mix meatballs, sauce and water in a bowl and pour on top. Cover with more mozzarella cheese. Bake at 350 for 30-35 minutes. 


See looks really good huh? Yah, we didn't think so. The original recipe did suggest toasting the bread first so it wouldn't be so soggy, but of course I didn't see that tidbit of info until after I made it and stuck it in the oven.  Oh well! 

January 18, 2013

Italian Sausage Melt

Last summer I got a really good deal on some italian sausage. However, it's been sitting in the freezer ever since because I didn't know what to make with it. Until, that is, I stumbled on this recipe for italian sausage melt. 


1 1/4 cups Original Bisquick® mix
1/4 cup butter or margarine, softened
2 tablespoons very hot water
1/2 lb Italian sausage
1cup Alfredo pasta sauce
1cup shredded mozzarella cheese 
2 tablespoons grated Parmesan cheese


Preheat oven to 400 degrees. Mix bisquick, water, and butter together in bowl. 

Spread onto bottom of greased baking dish. 


Cook sausage. Once cooked drain any grease there is and place on top of the bisquick. 


Spread alfredo sauce on top. (I just realized while typing this up the recipe calls for 1 cup of sauce, I used the whole jar-oops!) 


Top with cheese. (I didn't have any mozzarella so I used cheddar instead) Bake at 400 degrees for 25 to 30 minutes. Let cool for a few minutes before serving. 


It was really good. It reminded us of biscuits and gravy. I will definitely be making this again with only 1 cup sauce and mozzarella cheese to see if it tastes any different. 

January 16, 2013

Pepperoni Pizza Bread

I bought a bunch of frozen dough so of course, I searched pinterest for recipes. I found a recipe for this Pepperoni Pizza Bread here. Looks good!!


2 loaves (1 pound each) frozen bread dough, thawed
2 eggs, lightly beaten
1/3 cup olive oil
1/2 teaspoon each garlic powder
salt and pepper
1/2 teaspoon dried oregano
1 pound ground beef, cooked and drained
1 package (3-1/2 ounces) sliced pepperoni
2 cups (8 ounces) shredded part-skim mozzarella cheese
1 cup (4 ounces) shredded cheddar cheese

This makes 2 loaves. 


Preheat oven to 375 degrees. Flatten out dough into a large rectangle. 


In bowl mix together egg, oil, and seasonings.


Brush mix onto flattened dough. (save the rest of the mix for later)


Place your meat, cheese, pepperoni and any other veggies you want to add onto dough. 


Roll up starting with a long side. Place on cookie sheet and brush with oil/egg mix. 


Bake at 375 for 30-35 minutes. 


Yum! This was even good for lunch the next day! 


January 15, 2013

Chicken and Biscuit Casserole

I love the Banquet Homestyle County Chicken, mashed potatoes, and biscuit meal. So when I saw a recipe for Chicken and Biscuit Casserole I wanted to try it to see if it was as good as Banquet's version.


1 pilsbury biscuit tube 
1 can condensed cream of chicken soup 
1/2 cup of Sour Cream
1/2 stick of butter, melted
1 can of peas 
2 cups cooked chicken (cubed or shredded)
1 cup mild cheddar cheese
3 TBS milk


Preheat oven to 375. Mix cream of chicken soup and sour cream together in small bowl. 


In larger bowl mix together the chicken, peas (drained), milk, melted butter and the sour cream mix.  Spread this in the bottom of a baking dish. 


Cover with cheese. 


Place your biscuits on top. Bake at 375 for 35 minutes. 


It was so good. I usually can't eat peas, but I didn't even taste them in here. And Marley ate all my extra peas too so it was a win win. Everyone really liked it! 

January 11, 2013

Mini Won Ton Lasagna

I saw these cute little lasagna's on pinterest and just wanted to make them because of their cuteness. 


Won ton wrappers
pasta sauce
ricotta cheese
mozzarella cheese
italian seasoning


Preheat oven to 375. Spray muffin tin with non-stick spray. Place one wrapper in each cup. 


Fill with sauce, ricotta cheese, mozzarella cheese. Place another wrapper on top and repeat layers. Sprinkle italian seasoning on top. 


Bake at 375 degrees for 18-20 minutes. Let cool 5 minutes. 


Overall, they were pretty good. The original recipe says you could also add meat, which I think would help make them even better. 

January 9, 2013

Baked Spaghetti Bread

Marley has been begging for spaghetti for a long time. I'm not a big fan of just spaghetti so when I saw this recipe for Baked Spaghetti Bread on Pinterest, I decided I would make the child happy. 


1 Loaf Rhodes Bread Dough, thawed to room temperature 
6 oz spaghetti, cooked 
1 cup thick spaghetti sauce 
8 oz mozzarella cheese 
1 egg white 
Parmesan cheese 
Parsley flakes


Roll bread out into a large square. Place spaghetti, sauce and cheese in the center.


Cut one inch strips into dough down the side and within 1/2 inch of the spaghetti.


Braid strips and fold up the ends. 


Brush with egg white and sprinkle with parmesan cheese and parsley. Bake at 350 degrees for 30-35 minutes. Let cool for 5 minutes before digging in. 


It was so good! 


Marley actually had two servings which doesn't happen very often. I think next time I will make the spaghetti like I do for my spaghetti pie recipe with the eggs and cheese mixed in with the spaghetti. 

January 8, 2013

Monthly Menu Prep

In order to not go over my $1,000 grocery budget I set for myself for this year, I needed to get majorly organized.  Here's how I organize my dinners and shopping trips.

I get 5 of each coupon insert each week. I then only clip the coupons for items that I know we will eat/need/use.  I will not buy something if we won't use it, however, if it is free, then I will get it and either give it away or at least try it to see if we like it. Nobody can pass up something that's free!  After clipping my coupons I put them in my binder which is divided by category just like the grocery store is. I have several websites that I check to look for sales and coupon match ups (which tell you what coupons to use and what paper they came in)  I don't dedicate a lot of time to this, maybe a few hours a week, if that.

My next step is to decide what we're going to eat. First, when I pin a recipe on Pinterest it goes onto my 'food' board. Then when I want to make it for dinner I move it to my 'on the menu' board. Once I make them and blog about them, I delete them from there and pin my recipe on my 'my stuff' board. (Yes, I organize my pinterest boards when I have nothing to do)


Next, I made up a monthly calendar with all the dinners on it. There are a few leftover nights, or nights where I'm taking the easy route and making hamburger helper or something frozen, but for the most part everything is "homemade"  Notice I didn't put down any nights of eating out? We probably will do that even though it's not marked down, and in that case the meal we were supposed to have will just get bumped to another night.


Finally, I went through each of the recipes on the calendar and wrote down every ingredient I need to make them. Even if I knew I already have it, I still wrote it down (you'll see why in my final prep step)  I have a column for each item and another column to mark how many of them I need. This may not work for you so just try something else to see what works best for your family.

Okay so now that everything is planned, I needed to go to the kitchen and see what I have on hand. This step will help me because I'll figure out what I have vs. what I need for dinner. This goes back to the coupons. If something is on sale for a good price and I know I'll need it later for a recipe or two, I can buy it when it's on sale instead of buying it when it's not. I again made a chart like the same one I used to write down what I need. Then I compared the two charts and marked off what I have on the ingredients list. Again, this will help me to make sure I have what I need when I need it. I also won't buy stuff that's not on the list so in turn I'm saving more money.

So there ya have it. That's how I prepare. Next up is shopping!

January 7, 2013

My 2013 grocery challenge

I have decided to challenge myself to something for the year. My goal is to spend no more than $1000 on groceries for the entire year!

Few things first before I dive into the challenge. I am starting the year with a full fridge, deep freezer and cabinet of canned foods. I have at least 15 dinners in there already so I have a head start.

My family has 4 people in it, but Mason doesn't eat yet, and Marley eats small portions. We only eat cereal for breakfast and Mike isn't home for lunch so that will help me out a lot because we'll be able to eat left overs or "kid" food for lunch.

Okay, enough blabbing. My first grocery stop of 2013 was to Target. I spent $52.11 and got $10 back in gift cards to use on my next purchase. My next stop was our local grocery store to get the remaining items for our month of dinners, spending $20.40 (more on that tomorrow)

I will try to include a picture of each trip so you all can see what I'm getting and see that I'm not just feeding my family chicken nuggets and mac & cheese for dinner each night. And I will continue to post my dinner recipes that will now be made using what I buy as part of my "challenge"

$1000-$52.11-$20.40= $927.49 left.

This is my first trip. I ended up getting 40 items and spending $52.11